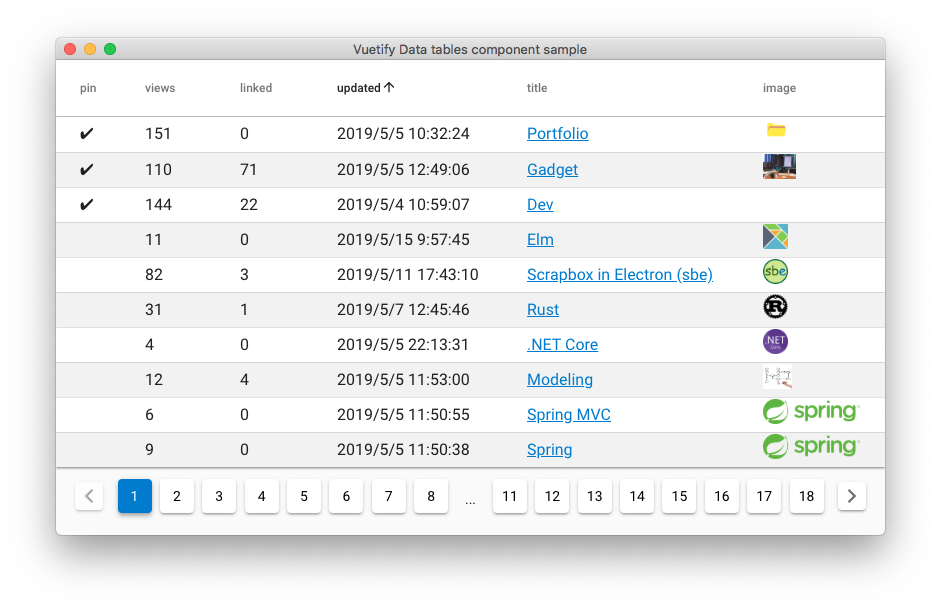
Vue の UI Component 集 Vuetify の Data tables Component を Electron アプリで使ってみたいと思い、組み込み方法を検討していました。
以前 electron-vue で Electron プロジェクトを生成して Vue 使う話を書きました。
このようなボイラープレートを使うのはプロジェクト全体を Vue で構築する場合はいいのですが、Vue 使っていない既存プロジェクトに部分適用したい場合には適しません。
Vue のセールストークとしては、プロジェクトに部分適用可能というのがあります。
他の一枚板(モノリシック: monolithic)なフレームワークとは異なり、Vue は少しずつ適用していけるように設計されています。中核となるライブラリは view 層だけに焦点を当てています。そのため、使い始めるのも、他のライブラリや既存のプロジェクトに統合するのも、とても簡単です。
そこで、アプリ画面を構成する html ファイルで で Vue と Vuetify を読み込んで、画面単位で利用することにしました。
  <head>
    <meta charset="UTF-8">
    <title>Vuetify Data tables component sample</title>
    <script src="https://cdn.jsdelivr.net/npm/vue"></script>
    <script src="https://cdn.jsdelivr.net/npm/vuetify/dist/vuetify.js"></script>
    <link rel="stylesheet" type="text/css" href="https://cdn.jsdelivr.net/npm/vuetify@1.5.14/dist/vuetify.min.css">
    <link rel="stylesheet" href="https://fonts.googleapis.com/css?family=Roboto:100,300,400,500,700,900|Material+Icons">
    <script src="https://unpkg.com/axios/dist/axios.min.js"></script>
  </head>
Scrapbox の API でページリストを取得して表示する画面を作成します。
template は vue ファイルを使わず、html に記述。v-data-table コンポーネント標準のページング部品は拡張性がない感じなので v-pagination コンポーネントをを連結して使っています。v-data-table の hide-actions 指定で標準ページング部品を隠せました。v-pagination のページングイベント(next, prev, ページの数字ボタンクリック) ハンドラのメソッドは @input 属性で指定できます。
<body> <div id="app"> <v-app> <div> <v-data-table :headers="headers" :items="items" hide-actions :pagination.sync="pagination" :total-items="pagination.totalItems" class="elevation-1" > <template v-slot:items="props"> <td class="text-xs-left">{{ props.item.pin != 0 ? "✔" : "" }}</td> <td class="text-xs-left">{{ props.item.views }}</td> <td class="text-xs-left">{{ props.item.linked }}</td> <td class="text-xs-left">{{ formatDate(props.item.updated) }}</td> <td class="text-xs-left"> <a :href="'https://scrapbox.io/'+ projectName + '/' + props.item.title" target="_blank" >{{ props.item.title }}</a> </td> <td><img :src="props.item.image" style="width: auto; height: 25px"></td> </template> </v-data-table> <div class="text-xs-center pt-2"> <v-pagination v-model="pagination.page" :length="page" @input="input" ></v-pagination> </div> </div> </v-app> <script> // You can also require other files to run in this process require('./renderer.js') </script> </body>
次に Vue の処理本体。html で指定している render.js に書いています。
API 叩いてデータを取得する関数 fetchData ではクエリパラメータでページング時のスキップ数やソートキーを指定。この関数を mounted、 v-data-table の pagination イベント、v-pagination の input イベントで呼んでます。
v-data-table のイベントはソート可能な列ヘッダーをクリックした時に発生します (ちょっと分かりづらい) 。data - headers では API でソートキーを指定できない列は sortable を無効化しています。Scrapbox の データの並び順(昇順・降順)は指定できないので descending は常に false で打ち消しています。
const app = new Vue({
  el: '#app',
  async mounted () {
    this.fetchData()
  },
  methods: {
    async fetchData () {
      const skip = (this.pagination.page - 1) * this.pagination.rowsPerPage
      let url = `https://scrapbox.io/api/pages/kondoumh?skip=${skip}&limit=${this.pagination.rowsPerPage}&sort=${this.pagination.sortBy}`
      const res = await axios.get(url)
      this.items = await res.data.pages
      this.pagination.totalItems = res.data.count
    },
    formatDate (timestamp) {
      // snip
    },
    input (page) {
      this.fetchData()
    }
  },
  computed: {
    page () {
      if (this.pagination.rowsPerPage == null || this.pagination.totalItems == null ) return 0
      return Math.ceil(this.pagination.totalItems / this.pagination.rowsPerPage)
    }
  },
  watch: {
    pagination: {
      handler () {
        this.pagination.descending = false
        this.fetchData()
      }
    }
  },
  data: () => ({
    items: [],
    pagination: {
      sortBy: 'updated',
      rowsPerPage: 20,
      totalItems: 0
    },
    headers: [
      { text: 'pin', value: 'pin', sortable: false, width: '5%' },
      { text: 'views', value: 'views', width: '10%' },
      { text: 'linked', value: 'linked', width: '10%' },
      { text: 'updated', value: 'updated', width: '25%' },
      { text: 'title', value: 'title', sortable: false, width: '30%'},
      { text: 'image', value: 'image', sortable: false, width: '25%' }
    ]
  })
})
無事データを取得して表示できました。

比較的簡単に1画面だけ Vue コンポーネントを使うことができました。今回の例では Electron 特有の実装は何もないですが、コンポーネント外の UI 部品と連携する場合は、 mounted で IpcRenderer のリスナーを定義することになります。